安装V2ray
因为在服务器上装东西的,用到了github,直接访问不了。本地windows系统用的v2rayN的客户端,想到v2ray在Linux上也可以用,就装上试一下。
v2ray本身是不区分服务端和客户端的,只要配置好相关文件,反正都可正常使用。(就是配置文件的区别)
1.下载 v2ray-linux-64.zip
v2ray的Github地址:
https://github.com/v2ray/v2ray-core/releases/
目前最新的版本是v4.31.0,下面有Download页面:
https://github.com/v2fly/v2ray-core/releases/tag/v4.31.0
在页面中找到 v2ray-linux-64.zip 文件下载(我的是64位的CentOS系统)。
下载后解压出来是一个 v2ray-linux-64 目录,用ftp工具上传到linux的服务器上。
当然,也可以直接把解压包上传后,再用unzip命令解压。
2.把文件复制到对应的目录中
用复制(cp命令)或移动(mv命令)都可以。这里用cp举例。
首先,进入 v2ray-linux-64 目录,可以用 ls -l查看目录下的文件。
目录中的几个文件需要修改下权限,需要添加下可执行的权限。
1
2
3
4
5
6
| cd v2ray-linux-64
chmod 755 v2ray
chmod 755 v2ctl
chmod 755 systemd/system/v2ray.service
chmod 755 systemd/system/v2ray@.service
|
然后复制目录中的文件到指定位置:
1
2
3
4
5
6
7
8
9
10
11
12
13
| cp v2ray /usr/local/bin/
cp v2ctl /usr/local/bin/
cp systemd/system/v2ray.service /etc/systemd/system/
cp systemd/system/v2ray@.service /etc/systemd/system/
mkdir /usr/local/share/v2ray/
cp geoip.dat /usr/local/share/v2ray/
cp geosite.dat /usr/local/share/v2ray/
mkdir /var/log/v2ray/
cp access.log /var/log/v2ray/
cp error.log /var/log/v2ray/
|
两个日志文件没有的话,自己新建一个就行,要保证所有人都有读写权限。
反正配置文件中不用的话,其实也无所谓,就先建着扔着。
还有一个config.json配置文件,等配置完了再复制。
3.config.json配置文件
原生的V2ray并不支持订阅,反正我本来就在windows下用的,直接在v2rayN的客户端,服务器列表中中右键->【导出所选服务器为客户端配置】,保存成config.json文件。
然后把这个config.json文件也上传到 v2ray-linux-64 目录中,再来复制。
1
2
| mkdir /usr/local/etc/v2ray/
cp config.json /usr/local/etc/v2ray/config.json
|
以下配置文件仅为参考(需将outbounds处settings中改成自己的):
1
2
3
4
5
6
7
8
9
10
11
12
13
14
15
16
17
18
19
20
21
22
23
24
25
26
27
28
29
30
31
32
33
34
35
36
37
38
39
40
41
42
43
44
45
46
47
48
49
50
51
52
53
54
55
56
57
58
59
60
61
62
63
64
65
66
67
68
69
70
71
72
73
74
75
76
77
78
79
80
81
82
83
84
85
86
87
88
89
90
91
92
93
94
95
96
97
98
99
100
101
102
103
104
105
106
107
108
109
110
111
112
113
114
115
116
117
118
119
| {
"log": {
"access": "",
"error": "",
"loglevel": "warning"
},
"inbounds": [
{
"tag": "socks",
"port": 10808,
"listen": "127.0.0.1",
"protocol": "socks",
"sniffing": {
"enabled": true,
"destOverride": [
"http",
"tls"
]
},
"settings": {
"auth": "noauth",
"udp": true,
"allowTransparent": false
}
},
{
"tag": "http",
"port": 10809,
"listen": "127.0.0.1",
"protocol": "http",
"sniffing": {
"enabled": true,
"destOverride": [
"http",
"tls"
]
},
"settings": {
"auth": "noauth",
"udp": true,
"allowTransparent": false
}
}
],
"outbounds": [
{
"tag": "proxy",
"protocol": "vmess",
"settings": {
"vnext": [
{
"address": "代理服务器地址用ip或域名",
"port": 7007,
"users": [
{
"id": "1xxx54fb0-be4c-4499-bc11-bba0ea64aabc",
"alterId": 0,
"email": "t@t.tt",
"security": "auto"
}
]
}
]
},
"streamSettings": {
"network": "ws",
"security": "tls",
"tlsSettings": {
"allowInsecure": false,
"serverName": "服务器名字"
},
"wsSettings": {
"path": "/bc66/",
"headers": {
"Host": "代理服务器地址用ip或域名"
}
}
},
"mux": {
"enabled": false,
"concurrency": -1
}
},
{
"tag": "direct",
"protocol": "freedom",
"settings": {}
},
{
"tag": "block",
"protocol": "blackhole",
"settings": {
"response": {
"type": "http"
}
}
}
],
"routing": {
"domainStrategy": "IPIfNonMatch",
"domainMatcher": "linear",
"rules": [
{
"type": "field",
"inboundTag": [
"api"
],
"outboundTag": "api",
"enabled": true
},
{
"type": "field",
"port": "0-65535",
"outboundTag": "proxy",
"enabled": true
}
]
}
}
|
我这里就没把log文件配置写进去,需要的话再写上:
1
2
3
4
5
6
| "log": {
"access": "/var/log/v2ray/access.log",
"error": "/var/log/v2ray/error.log",
"loglevel": "warning"
},
...
|
记得这两个文件看一下,要有读写权限。
4.启动v2ray
1
2
3
4
5
6
7
8
| # 启动V2ray
sudo systemctl start v2ray
# 检查V2ray状态
sudo systemctl status v2ray
# 设置V2ray开机自启动
sudo systemctl enable v2ray
|
V2ray状态:

5.检验代码是否生效
1
| curl -x socks5://127.0.0.1:1080 https://www.google.com -v
|
如果能返回google.com的源代码,即表示配置成功。
proxychains搭建使用教程
拥有v2ray后,再搭配proxychains,从而让各种linux上软件可以访问外网
一、Debian安装
1
2
| apt update
apt install proxychains -y
|
二、Centos安装
1、有epel源
1
| yum install -y proxychains-ng
|
2、无epel源
(1)下载源码
1
| git clone https://ghproxy.com/https://github.com/rofl0r/proxychains-ng.git
|
(2)编译和安装
1
2
3
4
5
6
7
| yum install gcc
cd proxychains-ng
./configure --prefix=/usr --sysconfdir=/etc
make
make install
make install-config
cd .. && rm -rf proxychains-ng
|
(3)查看proxychains是否安装
三、修改配置文件
已经准备好了一个可用的socks代理
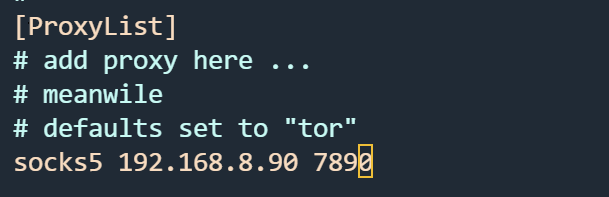
安装后默认配置文件在/etc/proxychains.conf
proxychains-ng支持多种代理模式:
- dynamic_chain :按照代理列表顺序自动选取可用代理
- strict_chain :按照代理列表顺序使用代理,所有代理必须可用
- round_robin_chain :轮询模式,自动跳过不可用代理
- random_chain :随机模式
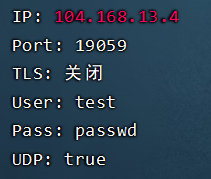
我们只需要编辑proxychains的配置文件,将scosks代理的ip,端口,用户名,密码填进去即可
1
2
3
4
| vi /etc/proxychains.conf #直接划到最后
#socks4 127.0.0.1 9050
socks5 104.168.13.4 19059 test passwd #填入socks代理信息
#保存并退出
|
四、使用
只需要使用代理的命令前加上proxychains就可以了,比如proxychains4 curl cip.cc,我们可以看到IP已经变成socks代理的IP。
当然,我们也可以直接输入proxychains bash,这样就能新建一个具有代理功能的新终端,不需要在每条命令前都加proxychains了。